
Integrations can improve the efficiency of any PowerClerk® workflow. Connecting systems to share data can reduce errors and save time. Reviews can be automated, systems can be synchronized, reducing copy-and-paste tasks for admins. This can free up valuable time for managers, engineers and analysts dealing with application backlogs.
Web Connectors enable PowerClerk to send requests to other systems. These might be customer information systems to collect or validate homeowner data, GIS or engineering systems to find grid connection points and run power flow analysis, or work order and asset systems to create or update entries. PowerClerk can initiate these requests on an event like a button click or a project status change.
We’re going to learn how to use the Web Connector feature to query a simple back-end service. If you have a PowerClerk sandbox available, you can follow along or request a new sandbox via a support ticket.
First, we need a service to query. We’ll use something fun for this example! This simple service uses data from NORAD to return the live location of the International Space Station (ISS) https://wheretheiss.at. Remember this is only an example, in reality your service will have authentication, security, and more useful data, but this example lets us safely learn about PowerClerk’s Web Connector.
Discovery: Take a look at the API
APIs usually have some documentation describing how to use them, the features, and parameter names. This might be in a standard format (OpenAPI/Swagger is popular for REST), an example (e.g., Postman), a web page or document. The ISS API has documentation but you don’t need to read it for this blog.
The API we need is: https://api.wheretheiss.at/v1/satellites/25544?units=miles. We can try it and view the response directly in a web browser.

Let’s break the request down.
The endpoint is hosted on the URL https://api.wheretheiss.at
The path for the service we need is /v1/satellites/25544, where the number is the NORAD catalog ID for the ISS.
By default, the service returns kilometers, but we can get results in miles with the optional query parameter units=miles.
The response is in a format known as JSON, which is common for modern web services, made of key-value pairs. Anything in double-quotes (including keys) is a string, numbers may be integers or decimals. Values can also be booleans, arrays, or nested JSON objects, which are all supported by PowerClerk but not needed here.
We will use the “units” string parameter, and the “latitude”, “longitude”, “altitude” and “visibility” numbers for this test.
Construction: Build the Web Connector
On the PowerClerk Program Design > Connections menu, under the Connection tab, click the “New Web Connector” button.
If you don’t have the button, you may not have the PowerClerk Integrations Bundle license. You can ask your Account Executive or Customer Success Manager to try it out in the PowerClerk demo system.
- Give the new Web Connector a friendly Name
- Change the HTTP Method to GET
- Set the Relative URL to /v1/satellites/{NORAD_ID}
- Leave the Payload Type as JSON.
Note that by putting NORAD_ID in curly braces in the URL path, we’ve made this a path parameter. This means we could map it to a PowerClerk Data Field, or build multiple configurations that track other satellites.
Click the “Add Request Field” button and, under “Key Name or Path Parameter,” enter “units”, then click “Ok”.
In the same way, with the “Add Response Field” button, add a field for “visibility”. Also add fields for “latitude”, “longitude” and “altitude”, but this time change the Field Type to “Decimal”. Note that the order doesn’t matter, nor does the “Is Required” option.
You should have a web connector like this one below. Finally, click “Save”.

Fueling: Test the Web Connector
Back on the Connections page, click on the row containing your new Web Connector to see the context-specific buttons. We will come back here a few times, but first click “Test”.
Here we add the Base URL for both Production and Test. One would be used in testing, sandboxes and TEs, the other in production. We can set them all to: https://api.wheretheiss.at
Typically, we would add authentication, but this service is public, so set the Authentication Type to None. We don’t need Custom Headers either, like vendor IDs or API keys.
Click “Save Properties” and we are ready to test.
The NORAD_ID for the ISS was 25544 and the units can be set to miles (or leave it blank for kilometers, if you prefer.)

Finally, click “Call Connection” to send a request. If everything is set correctly, you should see a green Success status, an expandable window with the response received, and a text box showing the parameters PowerClerk extracted from the response.
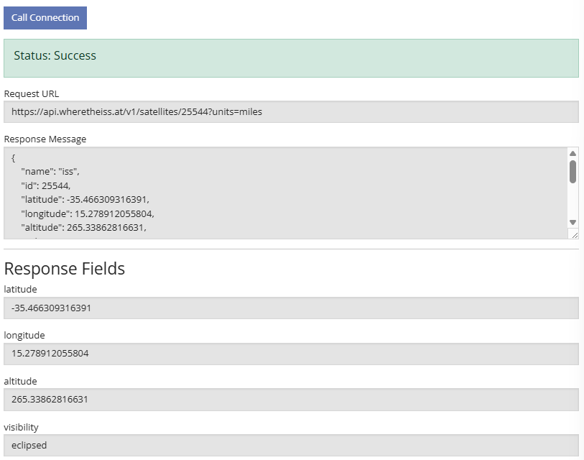
Make sure you saved your URL and authentication configuration in the previous step, then click the “Close” button to exit the test tool.
Countdown: Mapping the Data Fields
We want a form to fetch and display the data. We need Data Fields with types matching the Web Connection fields. To keep it simple, on a new form, create “Decimal” fields for Latitude, Longitude, and Altitude, and a “Single Line Text” field for Visibility. You can set these as read-only; they will still be updated from the Web Connector, but it sometimes doesn’t make sense for users to be able to edit the data. Create a “Drop Down List” for Units with choices for miles and kilometers. “Publish” the form.
Back on the Program Design > Connections page, click on the connection again to open the context-specific buttons. Click “Enable” which locks the design, and then “Create Configuration” where we map fields between the API service to PowerClerk.
The Configuration needs a unique Name. Further down the page, we can map the parameters with the drop down lists. For the NORAD_ID, select the “Fixed Value” option, and enter the ISS catalog ID 25544. We could create multiple configurations for different objects, or have the user enter the ID in a Data Field. Map the remaining Web Connector fields to the Data Fields from your form. Once you are finished, click “Save”.

Liftoff: Deploy the Web Connector
Open the Form configuration again and drag a “Call Connection” button onto the form and set the “Select a Connection Configuration” to your mapping.
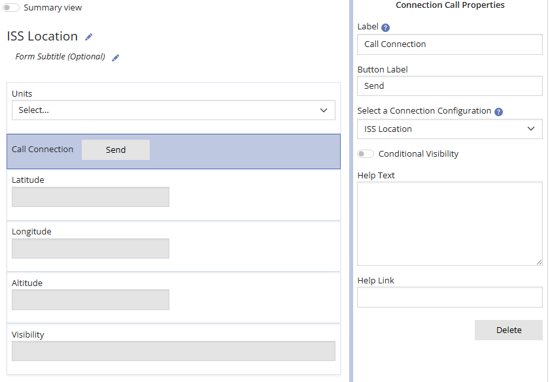
You can use PowerClerk’s “Preview” option to try the form.
Every time you click the button, the data will update with the new co-ordinates of the ISS. If you switch between miles and kilometers, obviously you need to click the button again to update the altitude with the new units.
Orbit: Bonus Location Configuration
If your PowerClerk program supports Location elements, you can post the ISS location directly onto a map with a few changes.
On the form editor, remove the Latitude and Longitude Decimal Field elements, and add a Location element. “Publish” the form.
Back on the Connections tab of the Connections page, open the context-specific buttons. Because you have an active configuration you need to make a “Copy” of your Web Connector. Edit the copy, and “Edit” the latitude and longitude response fields. Change their data types to “Location Latitude” and “Location Longitude” respectively, then “Save” the updated connection.
As you did before, “Enable” and “Create Configuration” for this new version of the connection. Set a new name and the Data Field mappings, this time with latitude and longitude to your location element.
Go back to the form editor and update the Call Connection element to the new configuration and test it again in a Preview.

As this example demonstrates, PowerClerk can be used to track space objects. However, the map’s default zoom level might be a little too close, particularly over the oceans where there’s less imagery. Zoom out to get a better view!
To learn more about web connectors, visit PowerClerk’s support site.